Use Google Tranlsate to Translate the Page or Open Manual Folder within the installed directory
HTML Web2ApK Compiler
Download HTML Web2ApK Compiler Link: https://store.steampowered.com/app/1463740/Html2APK_Compiler/ Link: https://youtu.be/HQZROHMbaoYHTML Web2ApK Compiler: Descriptive Trailer
Link: https://youtu.be/HQZROHMbaoYDescription:
- Html2Apk Compiler is software to compile website/html/progressive web app into beautiful android apps with a single click. No Coding Required. users can use to port there html games or web application to android, monetize it with admob, brand it with custom splash screen and engage more users into daily activities with free push notifications.
- Html2Apk Compiler allows user to build there own brand, establish presence of there services at playstore, Explorer app market space with no-coding needed.
- The List of Beautiful Apps & games made with it can be viewed at : Playstore App & games Library Link: https://play.google.com/store/apps/developer?id=Ankush+Rai&hl=en_IN Features of Html2Apk Compiler are as follows:
- 1 Click to Port Games to Android
- Easily Make Progressive Web Apps
- Convert Html/Website/Weblink to APK
- Custom Splash Screen
- No Coding Required
- Small App Size (Default 1.2MB)
- Monetize With Admob
- Engage User With Push Notification
- Modern WebAPI Support
- Convert to Online/Offline APP
- Compatible WIth PlayStore
- One Time Purchase
- Open App in Desktop/Mobile Mode
- Disallow Take Screenshot
- Operate WIth Crossorigin Data
- Custom Status Bar Color
- Custom Keystore for Playstore
- Single User License
- No Recurrent Subscription
- Version Maintenance
- File Access Support
- Easy to Develop App For Server Hosted Content/Services
Documentation & How to Use
- Html2APK Compiler Software Parts Description
- In this first section users need to fill up the details of there app which will be viewable by the users when the open your app.
- App Permisions
- Html or Weblink
- Main Menu Button
- App Settings
- Signing APK
- Splash Screen/Icon/Reload
- Admob Monetiation
- Javascript APIS
 When you open the applciation you will be greeted with a window. It will comprise of a playlist for trailer on how to use this software.
Secondly, you will have a set of buttons. You can click "html2apk compiler" button to open the main compiler.
The Language button will take you to the documentatiin page in other different language.
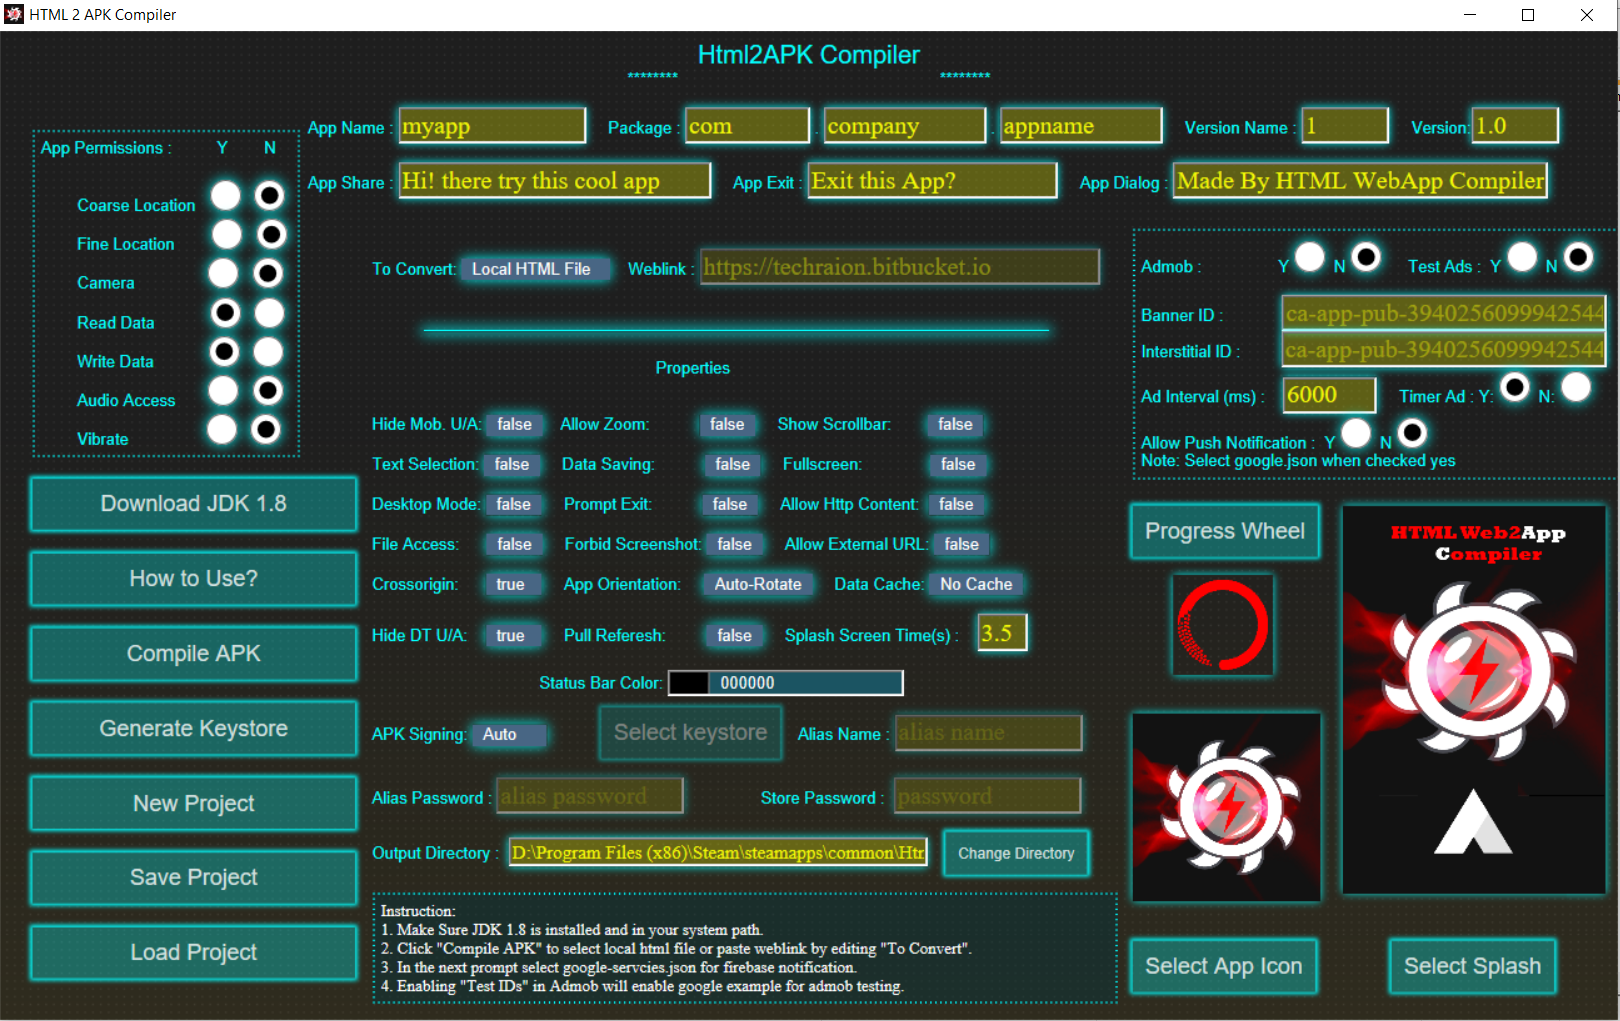 Here we will introduce the sub-parts of the Main Compiler that will help you understand to customize your android applciation as per your own requirments or that of your clients.
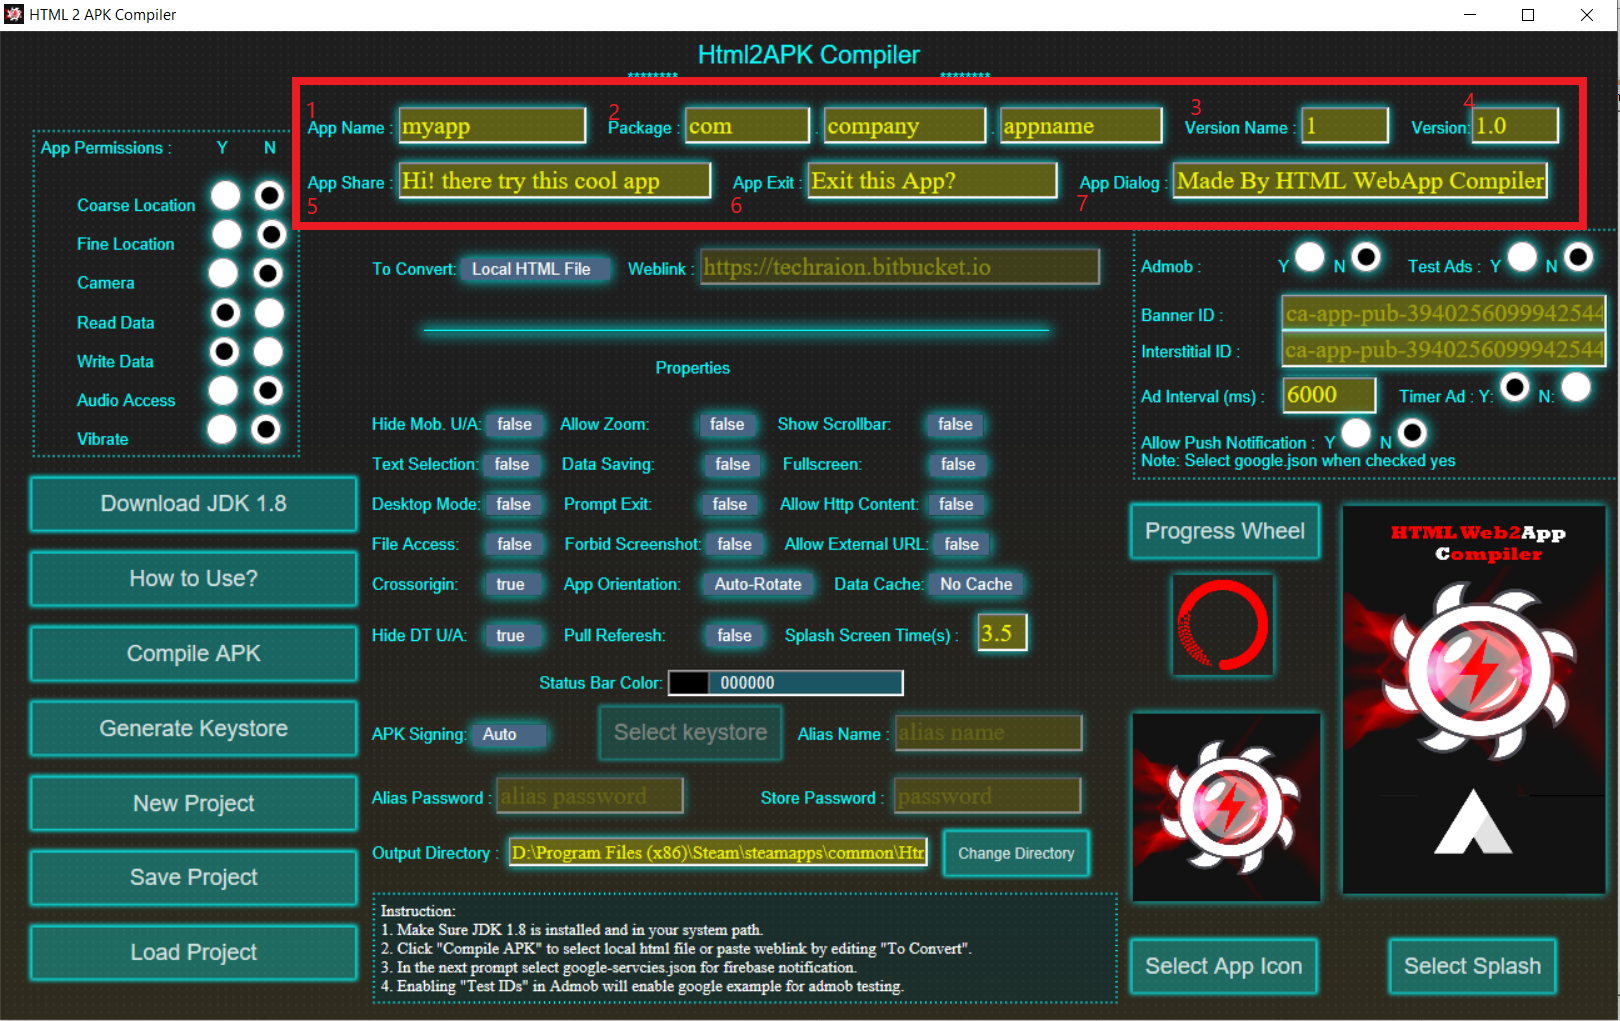
1. APP Name: The string you will enter here will be the name of your app displayed when your user installed the application. 2. Package: In Android development, a package name is used to uniquely identify an application's codebase. It is a unique identifier for an Android application that is specified in the app's manifest file. The package name is typically used to ensure that each application installed on an Android device has a unique identity. The package name is also used by the Android operating system to manage the application's resources, permissions, and security. It plays an important role in allowing the system to identify the application and manage its installation and updates. In addition, the package name is also used by the Google Play Store to identify and publish applications. When you publish an application to the Play Store, you must specify a unique package name that is not already in use by another application. Overall, the package name serves as a unique identifier for an Android application and is used by the system to manage the application's resources, permissions, security, and installation. Hence, the package name has template com.companyname.appname for example if my app name is "sampleapp" and my company is "mycompany" then the packagename will be com.mycompany.sampleapp . Or if you are a single devloper you can add your name (ex: john) in place of my company. 3. Version Name: the Version Name is a string that identifies the release version of an application. It is a human-readable string that typically includes a combination of numbers and letters that indicate the current version of the app. The Version Name is displayed to users in the app's description on the Google Play Store, and it is also used by developers to keep track of the app's release history. The Version Name is independent of the app's version code, which is a number used by the Android operating system to identify different versions of an application. The Version Name can be updated with each new release of the app, and it should be updated whenever changes are made that affect the user experience or functionality of the app. By keeping the Version Name up-to-date, developers can help users to understand which version of the app they are using and ensure that they are running the latest version with the latest features and bug fixes. Let's say you are developing a weather app called "WeatherNow" and you are getting ready to release version 1.0. The Version Name for this release could be "1.0", which would be displayed to users in the app description on the Google Play Store. If you later release a bug fix for version 1.0, you could update the Version Name to "1.0.1" to indicate that this is a minor update to the original release. If you then release a major update that includes new features and improvements, you might update the Version Name to "2.0" to indicate that this is a major release that includes significant changes to the app. 4. Version: In Android app development, the version of an app is a unique integer number that identifies a specific release of the app. It is used by the Android operating system to manage different versions of an application and to determine which version of an app is currently installed on a device. The version number is typically updated with each new release of the app, and it can be used by developers to keep track of changes and improvements made to the app over time. The version number is independent of the Version Name, which is a string that identifies the release version of the app in a human-readable format. For example, let's say you are developing a game called "Jungle Adventure". You start by releasing version 1.0 of the game, which has a version code of 1. If you make some changes to the game and release a new version with bug fixes and improvements, you might update the version code to 2. If you then release a major update that includes new levels and features, you might update the version code to 3. This way, the Android operating system can differentiate between the different versions of your app and ensure that users have the latest version installed on their devices. 5. App Share: This will be the default string that will be visible to the eprsion when you share your app with other users. 6. App Exit: This will be the default string that all ask a prompt from the user when user closes the application. 7. App Dialog: This will be default string of the app when users click on about section of the app or call the about section with the javascript API (more on API usage is presented down below.)
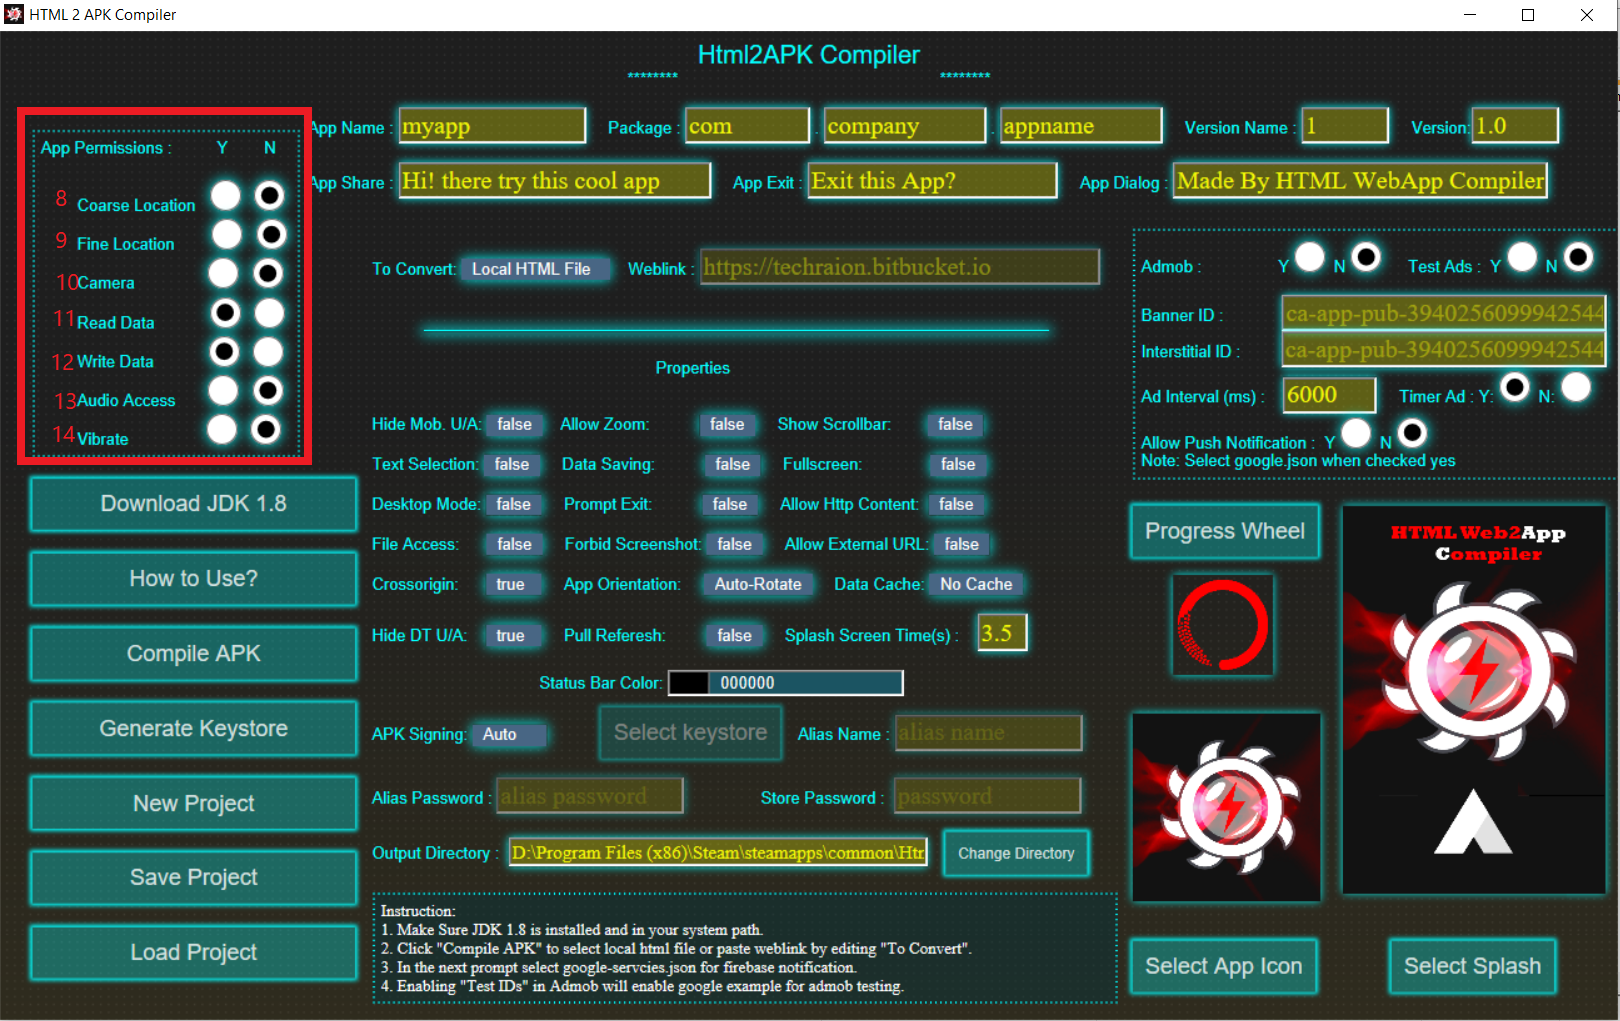
8. Coarse Lcoation: The Coarse Location permission in Android allows an app to access approximate location information of the device, such as the cell tower or Wi-Fi network the device is connected to. This permission is typically used by apps that need to determine the user's general location for features like weather updates or local search results. Unlike the Fine Location permission, which provides more precise location information, the Coarse Location permission does not provide access to the device's GPS sensor. You can access the GPS location with the Javascript API (more on it detailed below). 9. Fine Location: The Fine Location permission in Android allows an app to access the precise location information of the device, such as GPS data. This permission is typically used by apps that need to determine the user's exact location for features like navigation or ride-sharing. The Fine Location permission provides more accurate location information than the Coarse Location permission, which only provides approximate location information based on cell towers or Wi-Fi networks. You can access the GPS location with the Javascript API (more on it detailed below). 10. Camera: The Camera permission in Android allows an app to access the device's camera for capturing photos or videos. This permission is typically used by camera or video apps, but it can also be used by other apps that need to capture visual content for various features. When a user grants an app the Camera permission, the app can use the device's camera to take pictures or record videos. 11. Read Data: It allows the app to read from External/Internal Storage such as photos or documents stored on an SD card. 12. Write Data: It allows the app to write from External/Internal Storage such as photos or documents to be stored on an SD card. 13. Audio Access: The Audio permission in Android allows an app to record or play back audio on the device. This permission is typically used by apps that need to record or play audio, such as voice recording apps or music player apps. When a user grants an app the Audio permission, the app can use the device's microphone to record audio or play back audio through the device's speakers or headphones. 14. Vibrate: The Vibrate permission in Android allows an app to control the device's vibration feature. This permission is typically used by apps that need to provide haptic feedback to the user, such as messaging or notification apps. When a user grants an app the Vibrate permission, the app can vibrate the device in response to certain events, such as receiving a new message or notification.
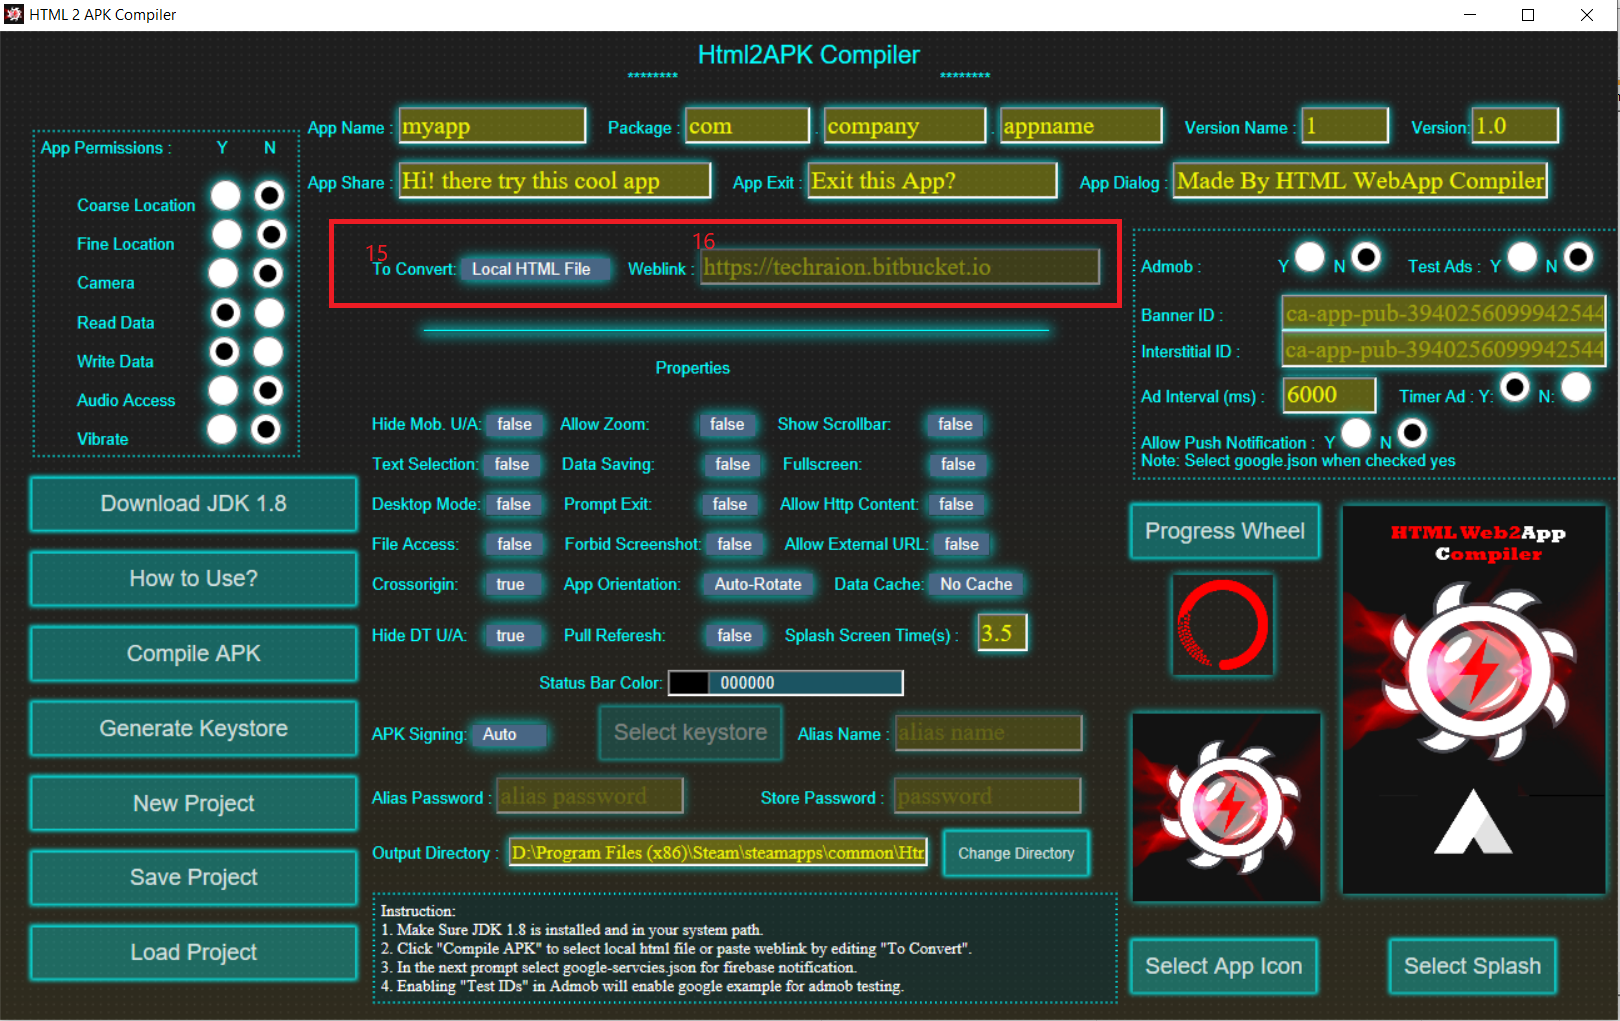
15. To Convert HTML FILE: When selecting this mode. When you click "Compile APK" button you will be asked to select "index.html" file which is locally saved on your hard disk. This will compile your locally *.html file and other conetents into andorid applciation. 16. To Convert Internet Web Link: When selecting this mode. When you click "Compile APK" button it will take input form the weblink mentioned as 15 in the above image.

17. Downlaod JDK 1.8:You need to download Downlaod JDK 1.8 from https://www.oracle.com/in/java/technologies/javase/javase8-archive-downloads.html You need JDK to create keystore for your andorid application. A keystore is a storage mechanism for security certificates. A public key certificate is used to sign an APK before deployment to services like the Google Play Store. Note: If you are debugging the apk then you won't need keystore but when you are going to upload it to playstore for production you need to generate your own keystore. 18. How to Use? : This will opne the documentation section. 19. Compile APK: This will open the window to select the index.html if you have selected for local html file else it will compile your apk with link you entered in 15 . 20. Generate Keystore: It will open txt file instructions to generate your own keystore. Note: After installation of JDK 1.8 and adding its bin folder in the path of your pc.
Install JDK 8 from https://www.oracle.com/in/java/technologies/javase/javase-jdk8-downloads.html ADD Java's bin diretcory in Path as Enviornemnt Varriable (How to add env. varriable: https://mkyong.com/java/how-to-set-java_home-on-windows-10/ ) 1. Open CMD 2. Type in the following command 3. rename myalias & myaliaspassword with your custom alias name & password respectively 4. rename nameofkeystore.keystore with your custom keystore name but with ".keystore" 5. A nameofkeystore.keystore will be saved in your CMD's current Directory. Note: visit https://techraion.bitbucket.io/pages/html2apkcompiler/ for translation and more tutorials. keytool -genkey -keyalg RSA -alias myalias -keystore nameofkeystore.keystore -storepass myaliaspassword -validity 36000 -keysize 2048
21. New Project: This will reset all the settings to teh default. 22. Saved Project: This will save the reset into a save file. 23. Load Project: This will load the saved file settings, which was saved in 21.
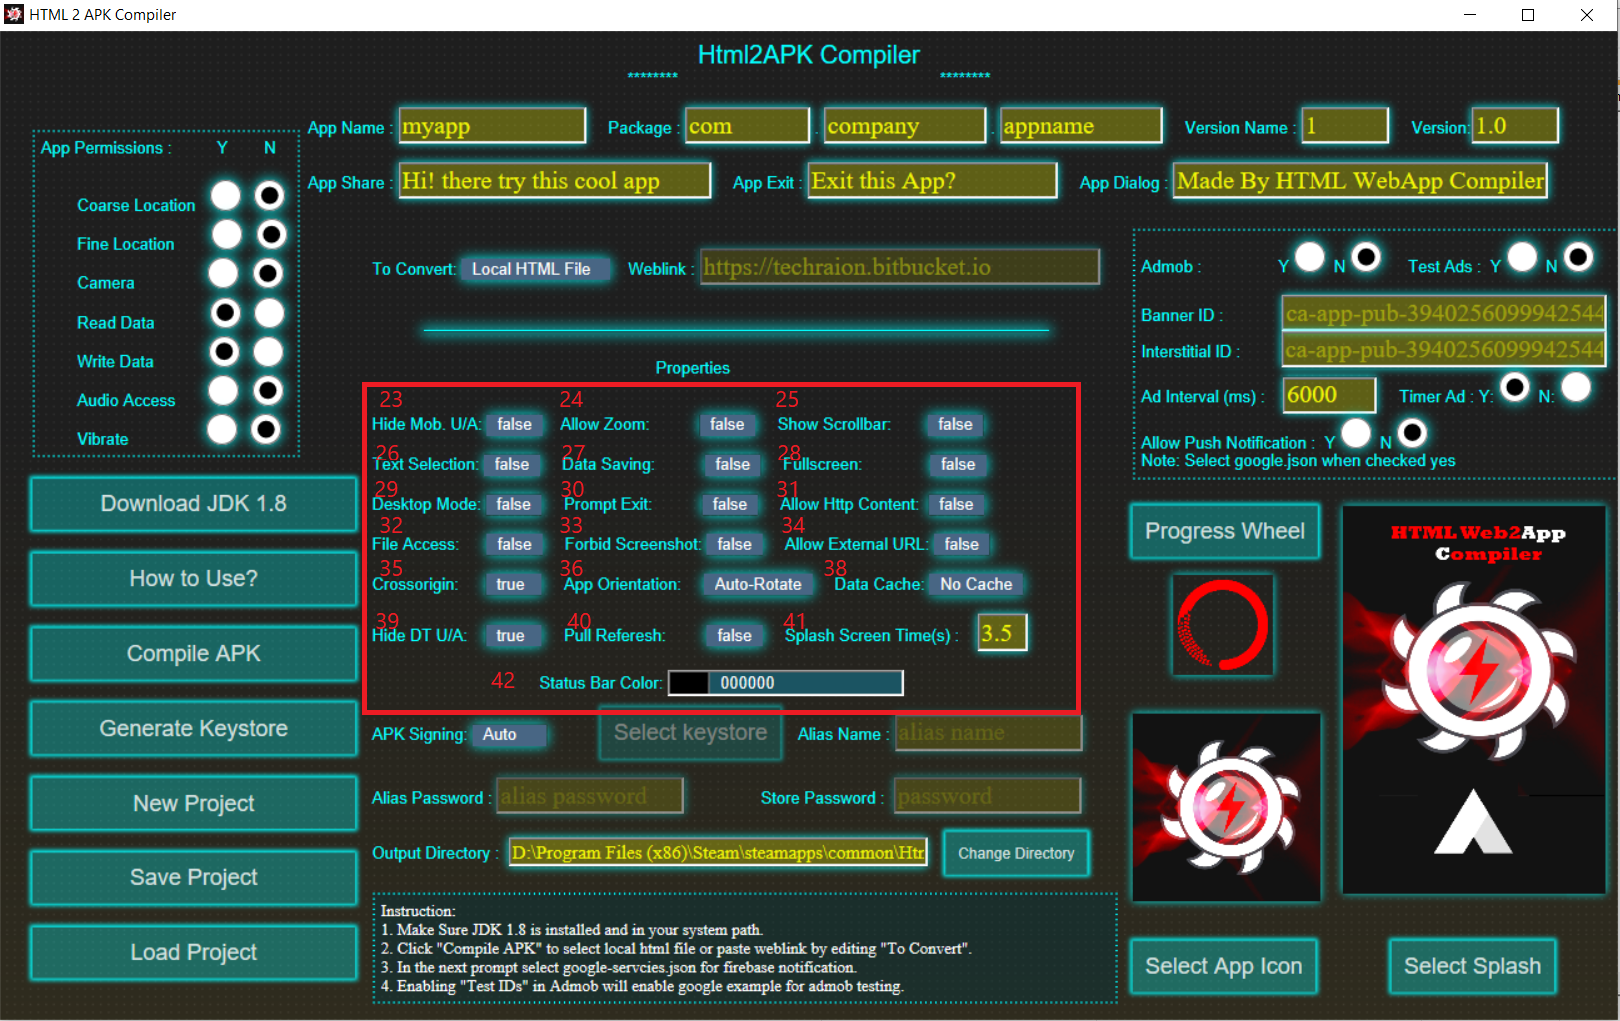
24. Hide Mob U/A: The mobile user agent in Android WebView is a string of text that identifies the device and browser being used to access a website. It is sent along with every HTTP request made by the WebView to the server hosting the website, and it helps the server to deliver content optimized for the device and browser in use. Serves the html content for mobile in mobile view.
25. Allow Zoom: Allow zooming in andorid application or not.
26. Show Scrollbar: Allow scrolling in andorid application or not.
27. Text Selection: Allow text selelction in andorid application or not.
28. Data Saving: Allow saving of data in form of local storage in andorid application or not.
29. Fullscreen: Allow fullscreen view of your app in andorid application or not. Best suited true for games.
30. Desktop Mode: Open the html content in desktop view mode in andorid application or not.
31. Prompt Exit: Prompt before user exit the andorid application or not.
32. Allow Http Content: Allow less secure http:// sites in andorid application or not.
33. File Access: Allow access of files in andorid application or not.
34. Forbid Screenshot: Allow screenshoting when the app is open or not.
35. Allow external URL: Allow opening of external URLs in andorid application or not.
36. Crossorigin: Allow loading resources from other sites in andorid application or not. In HTML, cross-origin refers to the concept of loading resources from a different domain, protocol, or port than the one the current document was served from. For example, if a web page served from https://example.com tries to access resources such as images or scripts from https://cdn.example.net, it is considered a cross-origin request.
Due to security reasons, modern browsers prevent scripts from making cross-origin requests by default, unless they are explicitly allowed by the server through Cross-Origin Resource Sharing (CORS) headers or through other methods such as JSONP. This helps prevent unauthorized access to sensitive information or resources.
37. App oprientation: Set app orientation to landscape, portrait or of that set by user.
38. Data Cache: Allow websites to save data in cache or not.
39. Hide DT U/A: A desktop user agent in Android WebView is a string of text that identifies the device and browser as a desktop browser rather than a mobile browser. By setting the user agent to a desktop browser, websites may serve different content to the WebView, such as a full desktop version of the site rather than a mobile-optimized version. Serves the html content for mobile app in desktop view.
40. Pull referesh: Allow referesing by pulling down gesture in andorid applciation.
41. Splash Screen Time: Set the time of splash screen to be viwed by the user opening the android application. Time is in seconds.
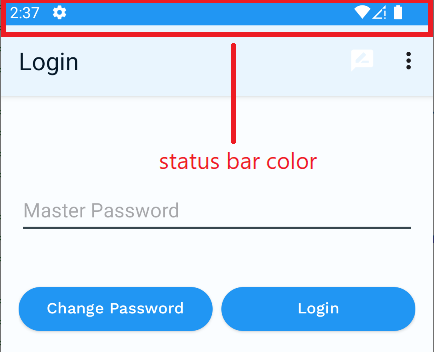
42. Status Bar Color: Set the status bar of the header of the android application.
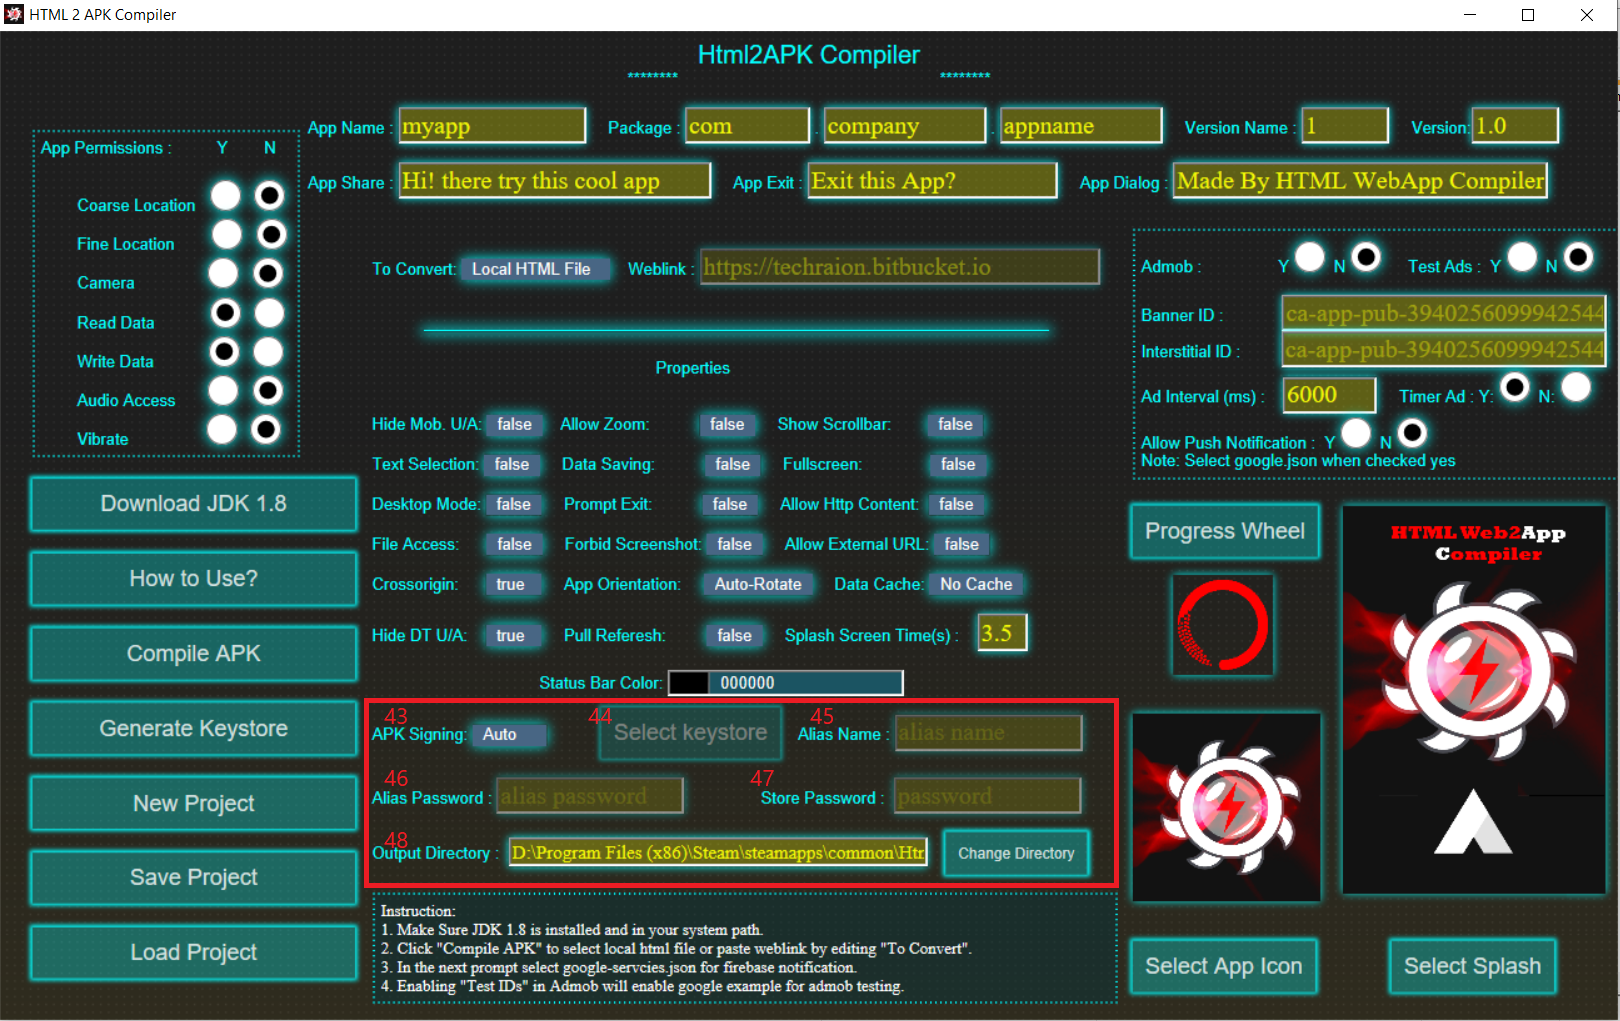
43. APK Signing : There are 2 methods of signing an apk. first is through "Auto" method. This method signs your apk for dubg mode. Seocndly, it signs your apk with your custom keystore. Please visit point 20 on how to generate your keystore 44. Select Keystore : Click the button to select your production level keystore. generated in point 20. 45. Alias Name : When you will be generating your keystore you need to provide your alias name. Just copy and paste that in here. 46. Alias Password : When you will be generating your keystore you need to provide your Alias Password. Just copy and paste that in here. 47. Store Password : When you will be generating your keystore you need to provide your Store Password. Just copy and paste that in here. 48. Output Directory / Change Directory : Click on chnage directory to select thee directory where you want your apk to be saved.

49. Progress Wheel : Select your own custom png file. It is a reload file which will be used when web page is loading. 50. App icon : Select your own custom png file. It is an icon for your app which will be used when app is installed. 51. Select Splash : Select your own custom png file. It is a splash screen file; which will be visisble when your app is opened in android phone (Mostly used for branding).
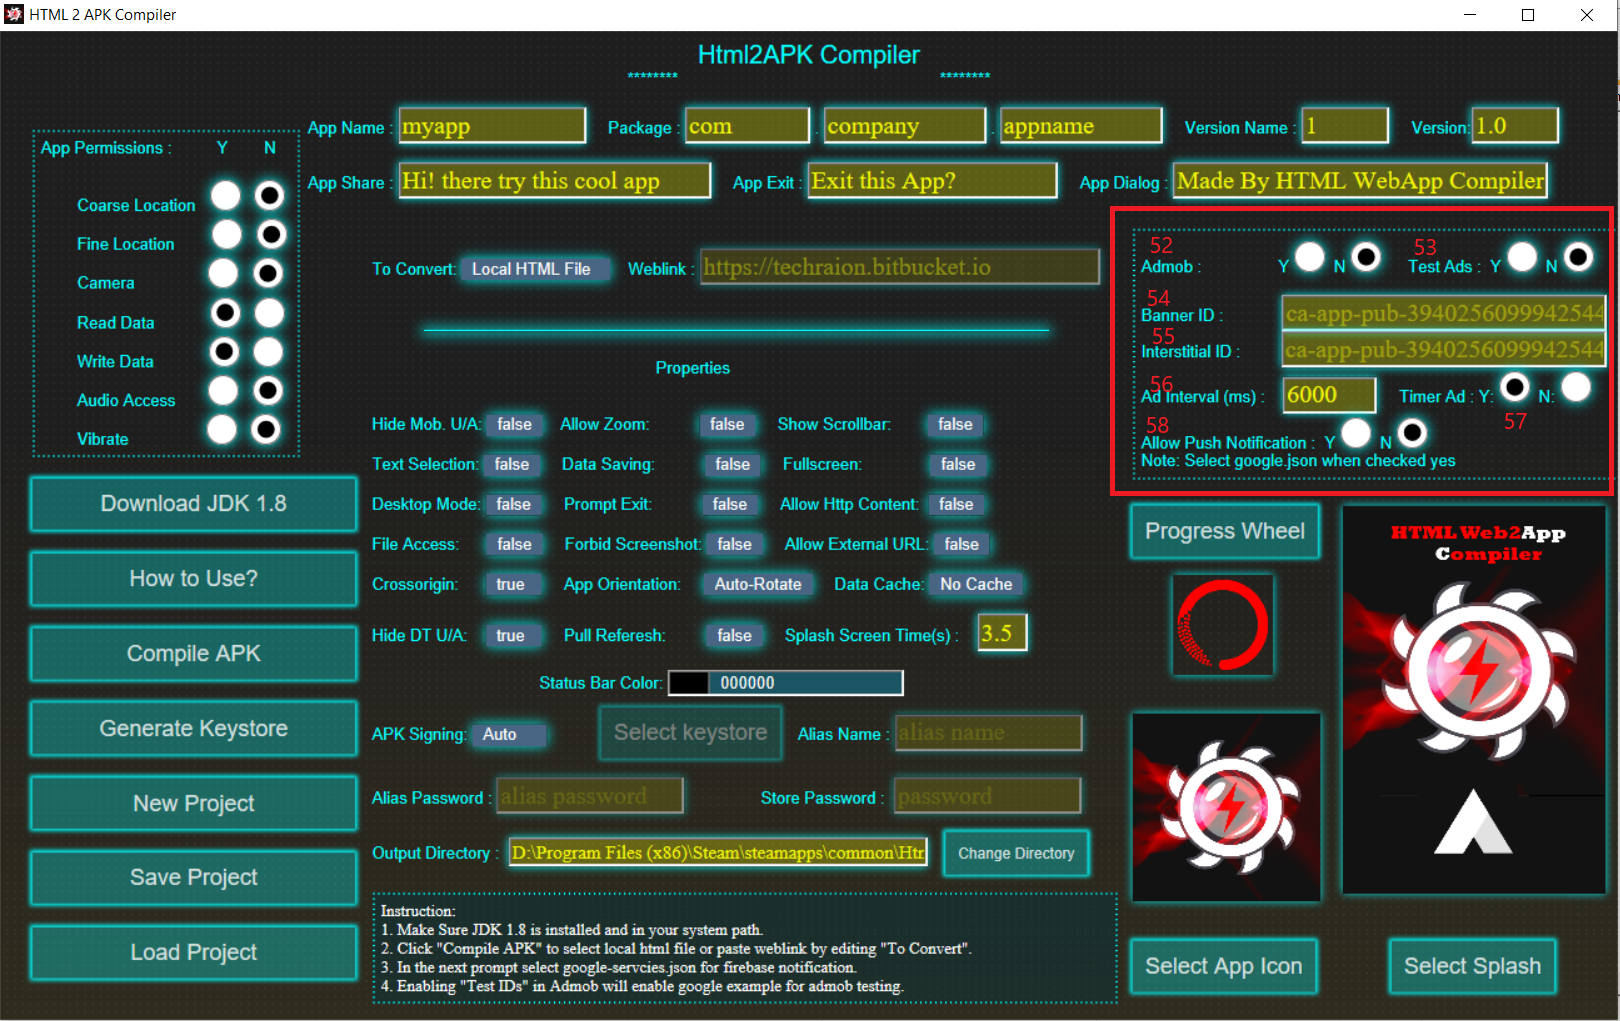
52. Admob yes or No : Sleect yes when you wnat to monetize your aapp with Google's Admob.
53. Test Ads : Sleect yes when you want to test monitization of your aapp with Google's Admob. If you selectd yes then your Banner Ad & Interstitial Ad ID will be
Banner ca-app-pub-3940256099942544/6300978111
Interstitial ca-app-pub-3940256099942544/1033173712
If you are selecting your test ads as no and admob as yes then You need to provide your own Banner Ad & Interstitial Ad ID. The tutorial for it is as shown below:
Link: https://youtu.be/zC075pcM7rc
54. Banner ID : Id of your Banner Ad geenrated as mentioned in above video.
55. Interstitial ID : Id of your Interstitial Ad geenrated as mentioned in above video.
56. Ad Interval : Set Ad interval in 56 as yes and add the time(is in milli seconds) in seconds x 1000.
57. Timer Ad: Select it if you want your Interstitial Ad to automatically open in few seconds then set Ad interval in 56 as yes and add the time(is in milli seconds) in seconds x 1000
58. Allow Push Notification: Enable it yes if you want it to send push notification to users who have installed your app.
Push notifications are a powerful tool for engaging with users in an Android app. They allow app developers to send timely and relevant messages to users even when the app is not actively running on their device.
Some common use cases for push notifications in Android apps include:
1.Promoting new app features or content
2.Sending alerts or reminders to users about upcoming events or appointments
3.Providing personalized recommendations based on user activity or preferences
4.Notifying users of special promotions or discounts
5.Sending important updates or alerts related to the app or service.
By using push notifications effectively, app developers can increase user engagement and retention, improve app ratings and reviews, and ultimately drive more revenue for their business.
Follow the below steps for generating service.json to be used when you select Allow Push Notification Yes.
To obtain the server key and google-services.json file, the process involves configuring Firebase.
Start by logging in to the Firebase Console.
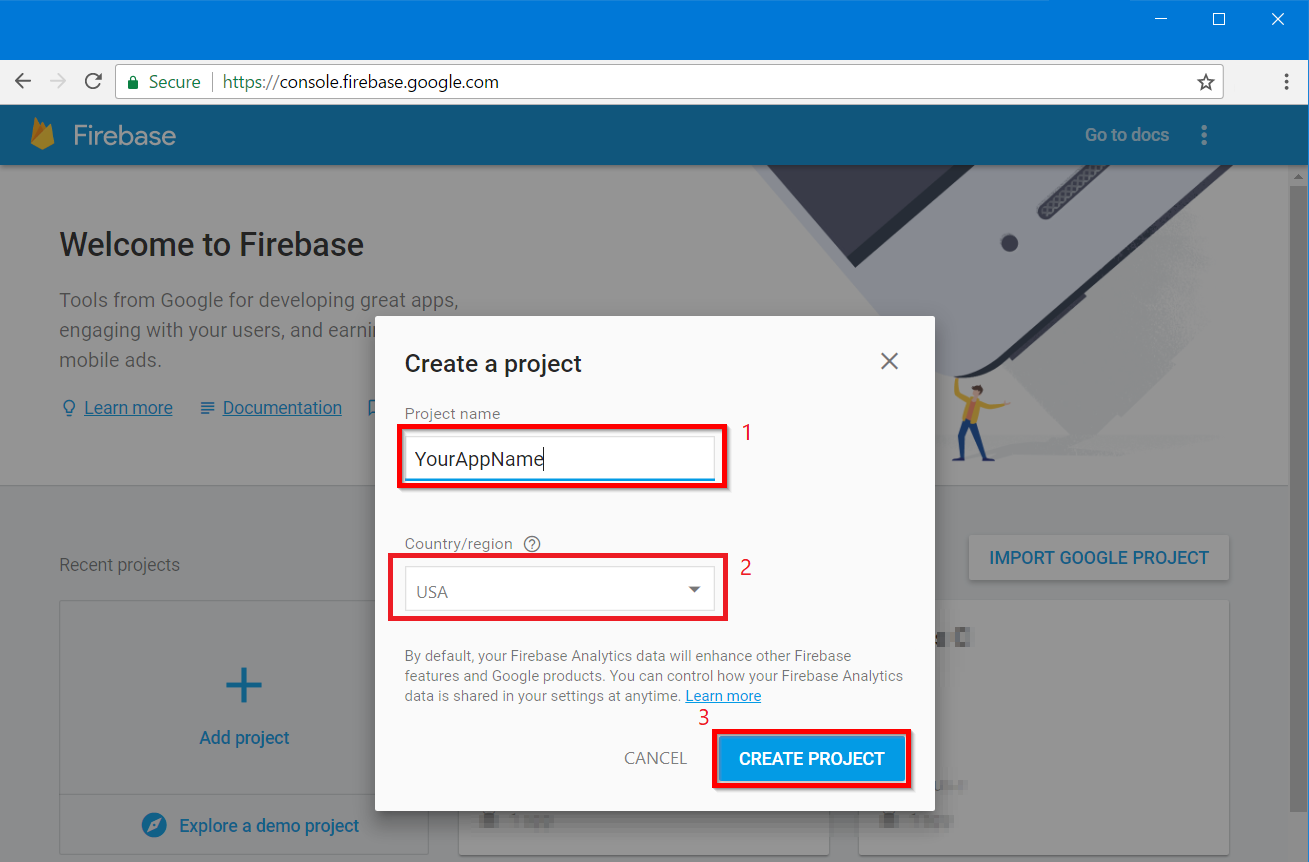
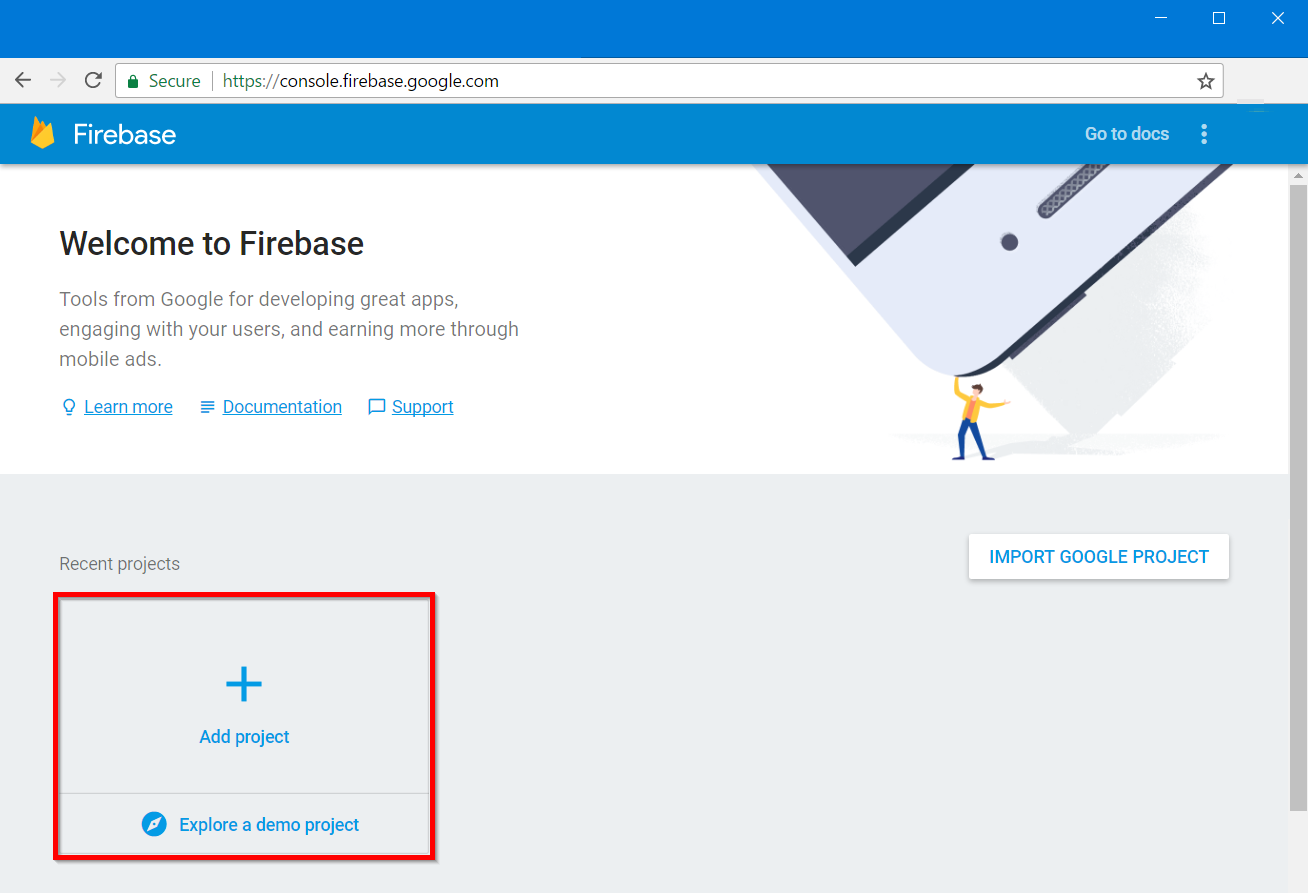 Create a project in the console.
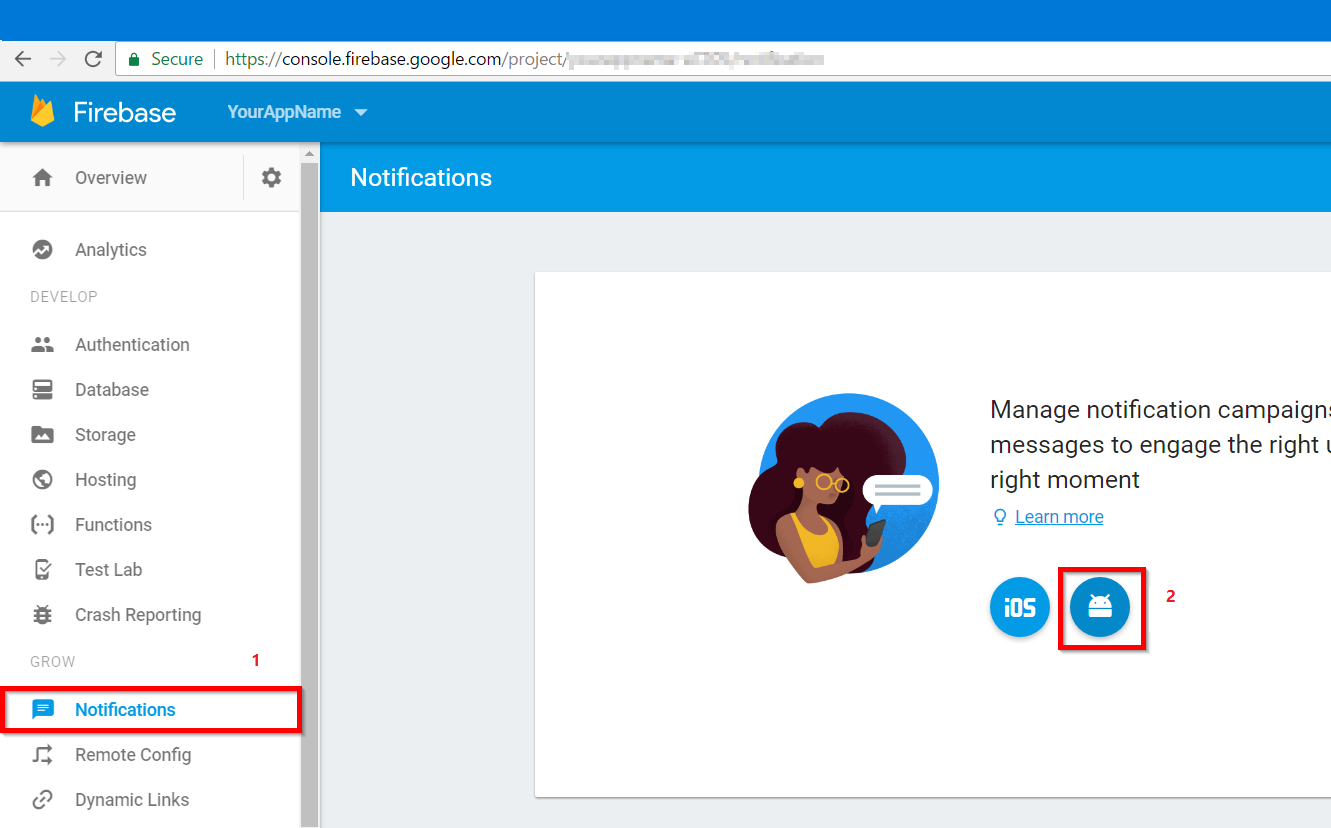
 Configure notifications for your project.
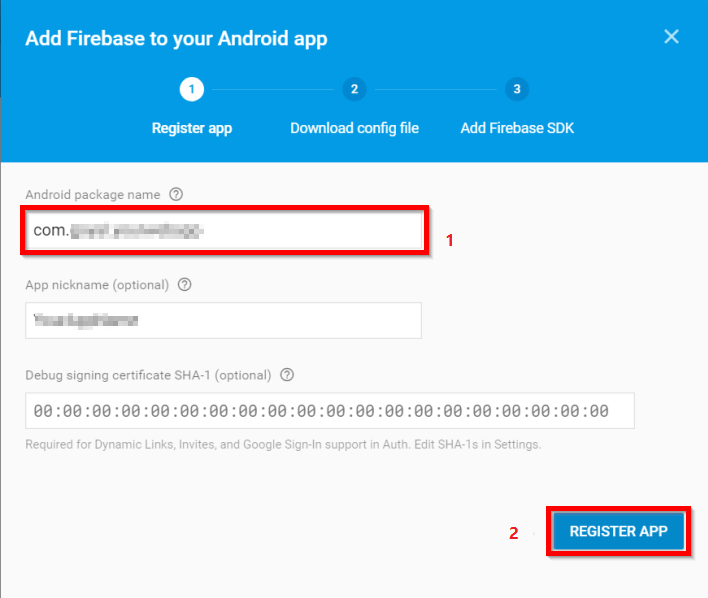
 Add your app's details to the project.
 Download the google-services.json file.
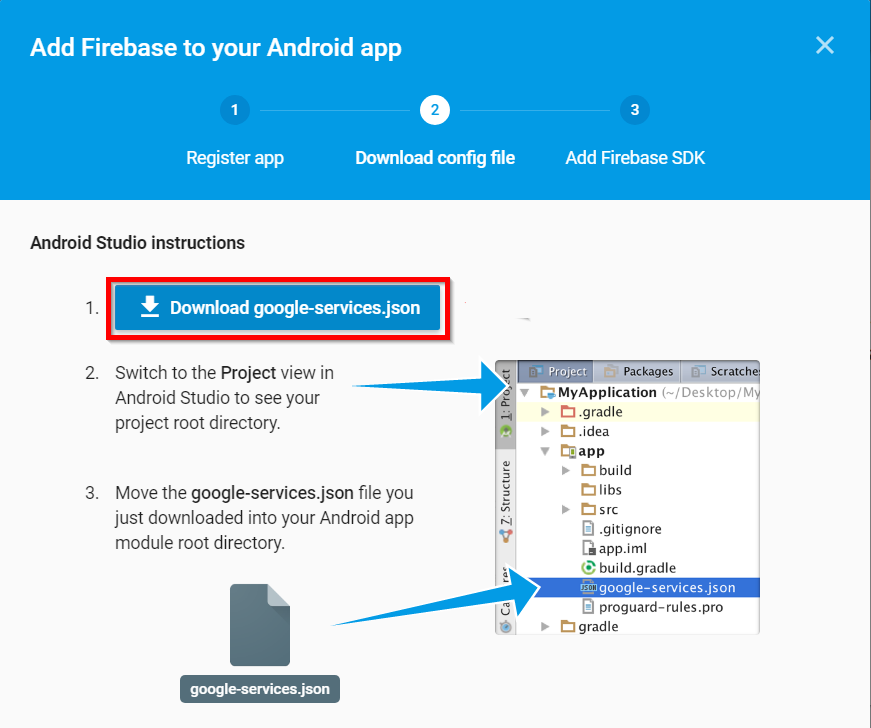 Obtain the FCM Server Key.
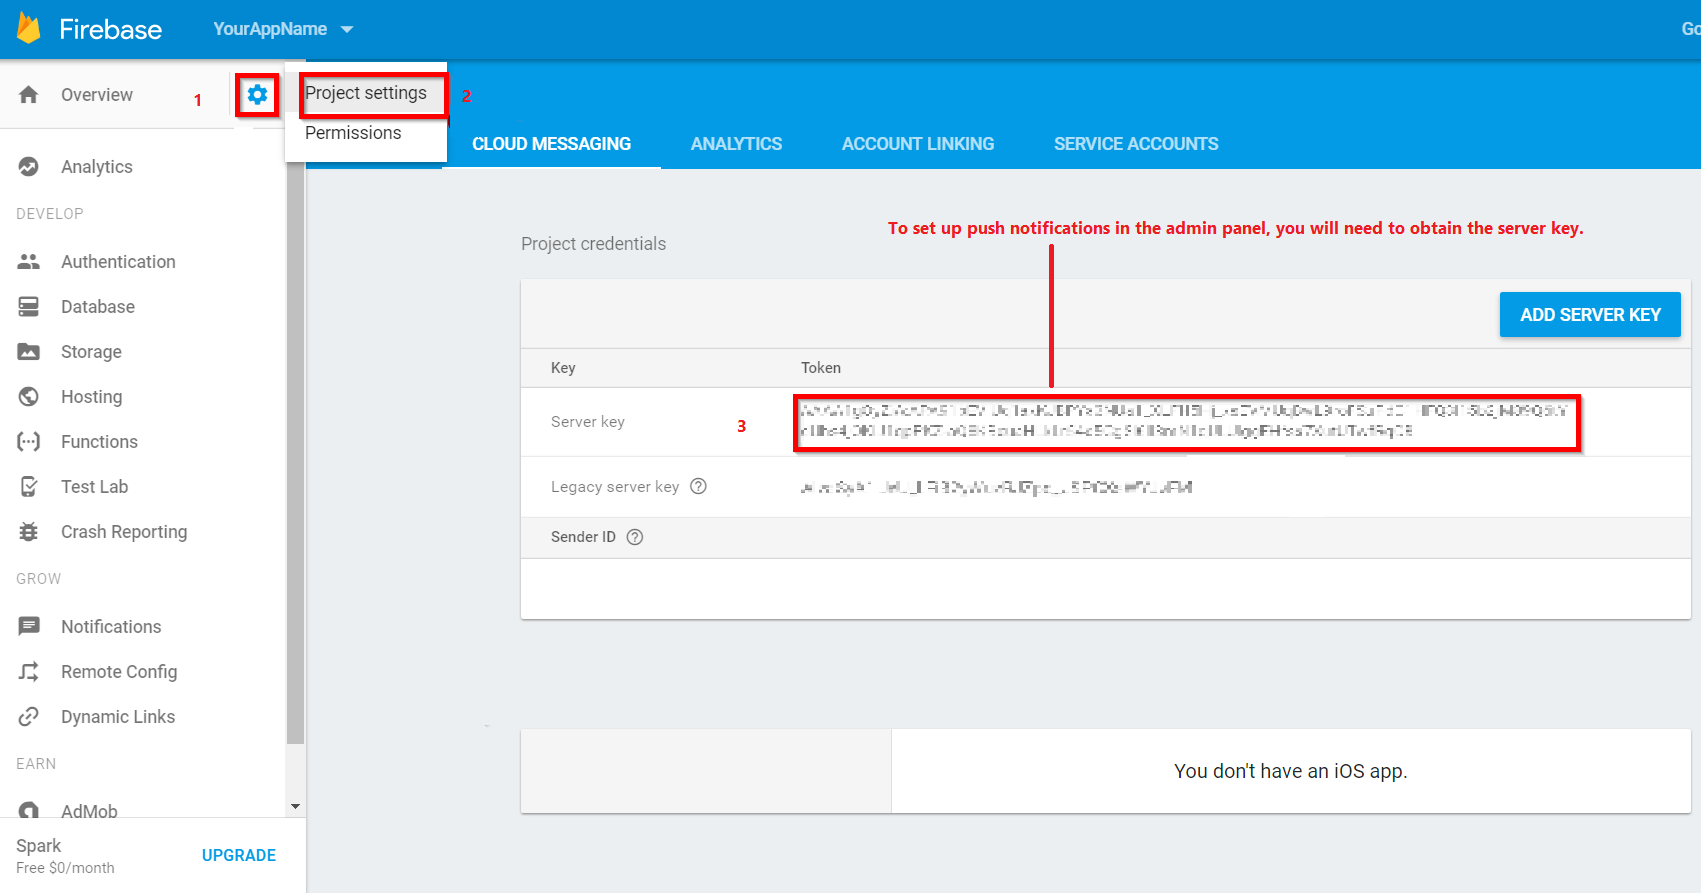 With the server key and google-services.json file in hand, you are ready to integrate push notifications.
To integrate Firebase Push Notifications in your app,
enable Yes to Allow Push Notification as mentioned in 58 above. Select servcies.json feature by clicking "Yes",
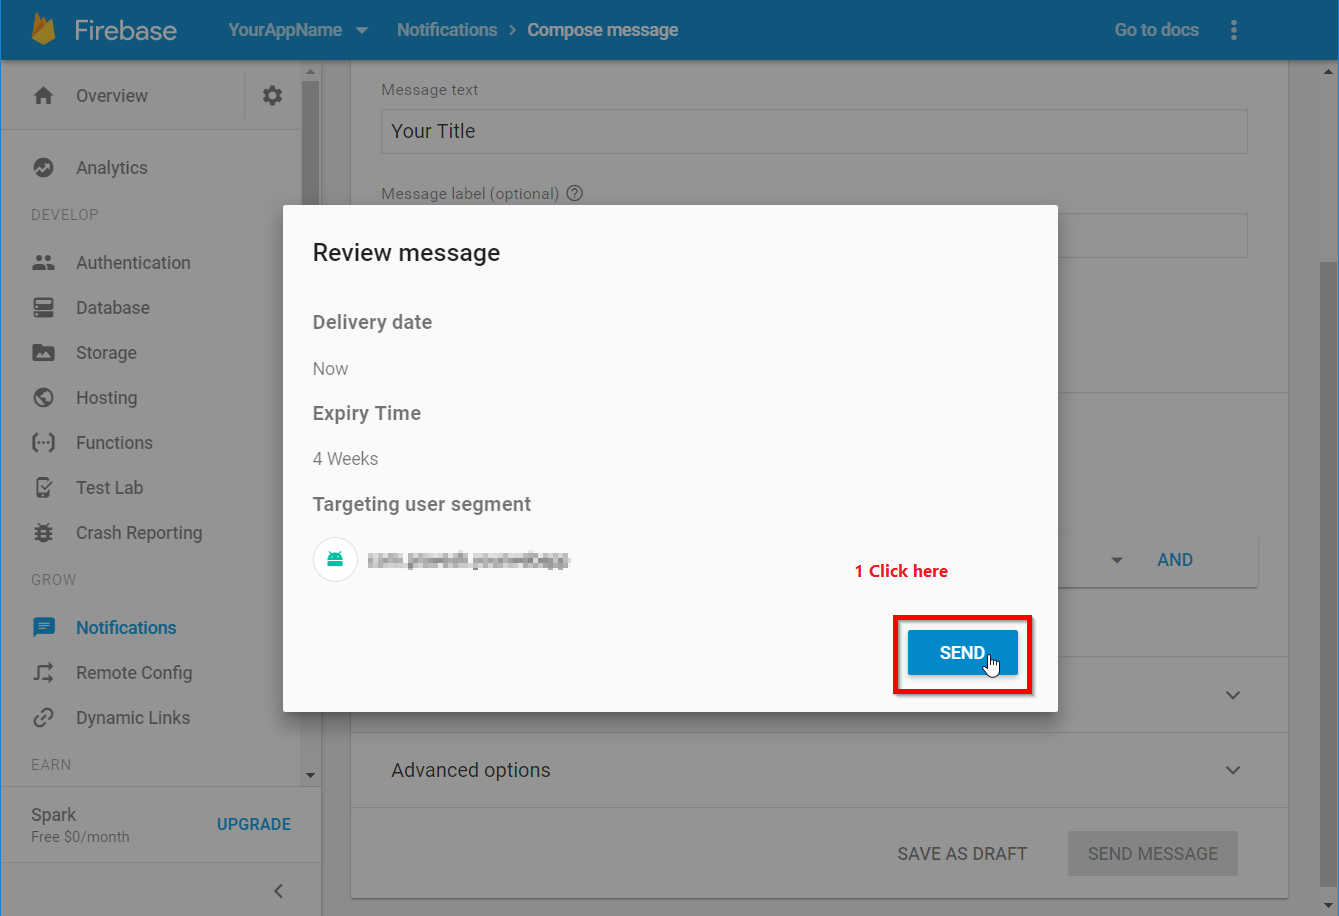
How to Push Notification to user's App
Start by logging in to the Firebase Console. Navigate to the Notifications tab. Click on "Send your First Message."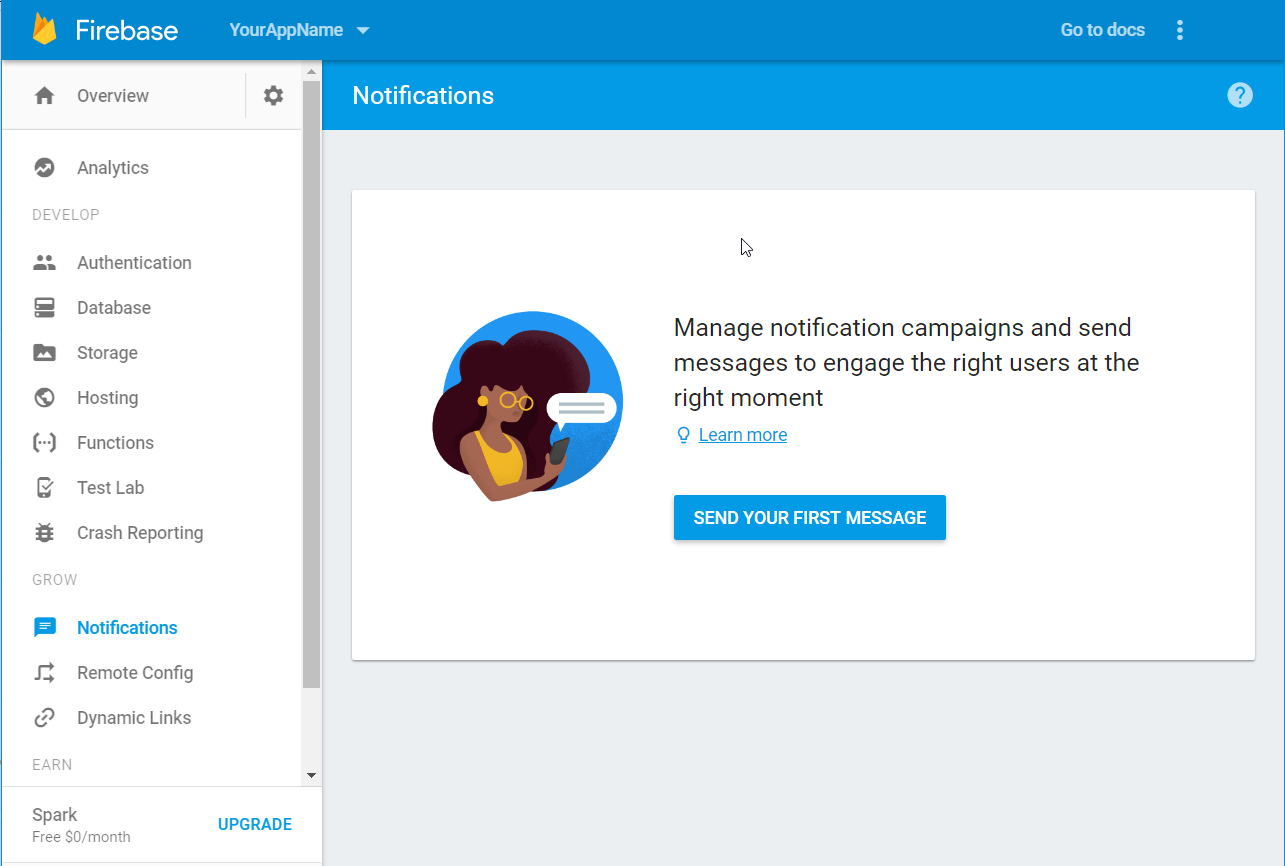 Fill in the necessary details.
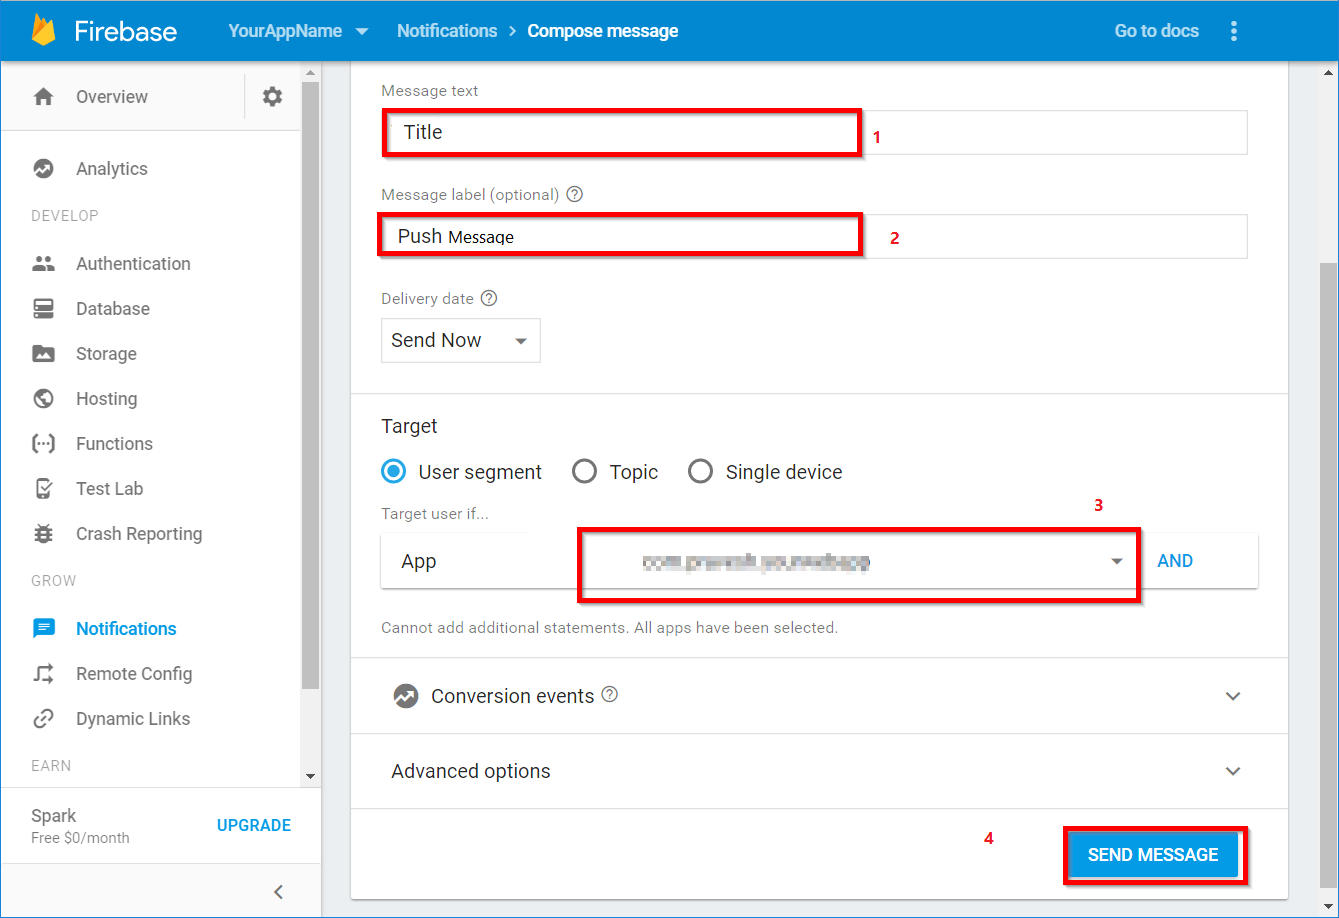 Click "Send" to deliver the notification.
Since, You can are usinh HTML , JS. Hence, you can use any JS API mentioned here : https://www.w3schools.com/js/js_api_intro.asp Or https://developer.mozilla.org/en-US/docs/Mozilla/Add-ons/WebExtensions/Browser_support_for_JavaScript_APIs Apart from that you can invoke android functionality by calling following Javascript functions: To Close The App. html2webapp.closeapp() To Display ABout Section of the APP html2webapp.displayabout() To display Toast Message in APP html2webapp.notifytoast('My Simple Toast Message'); To Open external link in Browser html2webapp.openlinkinbrowser('https://mysite.com') To PrintScreen html2webapp.printscreen() To Open Rate my App Menu html2webapp.ratemyapp() To Reload page html2webapp.reloadmypage() To Open Share my App Action html2webapp.sharemyapp() To display interstitial add: Use can use it on any speciifc page or use it in your own game logic to add credits to player when they watches ad html2webapp.displayinterstitial(); To Open display on or off banner ads by calling this function with false or true to off & on banner ad respectively. html2webapp.allowadmobbanner(false); // or true